fbpx

Pay over time on orders over $45 with Klarna.

724-276-6660  |  info@thesteelorchid.com

Free Delivery on All Orders

Search
Close this search box.

Gluten-Free Dairy-Free Hamantaschen

Here is a traditional Hamantasch recipe in honor of our upcoming Holiday of Purim.

Gluten-Free Dairy-Free Hamantaschen

Every year My family and I look forward to baking these special jam filled cookies.  We have turned the whole process of dough preparation into a fun and absorbing family event.  First, someone rolls out the dough (we used a can last time for the rolling) A second person cuts out the circle shapes with the opening of a glass cup, while a third person puts in the center a dab of jelly (or chocolate chips). Lastly, a fourth person shapes the dough into a beautiful three cornered cookie. 

Afterwards, we hold our breath as the Hamantaschen bake in the oven and we  hope that the corners stayed down and the jelly stayed in place. Right, I should mention that after all of this, we do some very important taste testing 🙂

The original hamantasch recipe can be found in Beni’s Family Cookbook for the Jewish Holidays (on page 54). https://www.amazon.com/Benis-Family-Cookbook-Jewish-Holidays/dp/0805037357

This book was inherited from my Grandfather who was a bread baking blue ribbon champion.  I can feel some of his loving presence keeping me company as I peruse the whimsical pages and read the recipes.

Each recipe begins with a cute little narrative about the imaginary bear family and their extended relatives.  There’s the Mama and the Papa and a collection of Aunts and Uncles and cousins all of whom have a favorite recipe to share.

I have substituted the wheat for Trader Joe’s gluten free flour mix as well as some almond flour. As for the cream cheese that is called for, I took a risk and used daiya dairy free cream cheese.  Instead of margarine I substituted with filtered coconut oil (filtering takes away most of the coconut flavor). I used almond milk instead of the regular milk, and I added freshly grated lemon zest and squeezed lemon juice to the mix to brighten up and counteract the sweetness.

Ah, yes, speaking of sweetness; I will probably cut back next time a bit on the sugar as well.  I think that since we already have a sweet filling, the dough should have a bit of a different flavor profile to compliment the sweetness. Don’t get me wrong. It was still delicious and tasty and had a good texture in the end, but for those who like to have a more subtle layer of flavor and have less of a sweet tooth, I definitely think a bit less sugar is the way to go!

After all is said and done, you probably wouldn’t be able to recognize the original recipe at all, but I have to give credit to the original inspiration which served as a solid base to work off of.

Ingredients

  • 2 cups gluten free flour blend (Trader Joe’s)
  • 1 cup blanched almond flour
  • ½ teaspoon baking soda
  • 2 teaspoons baking powder
  • ¼ teaspoon salt
  • ⅔ cup sugar
  • ⅛ teaspoon cinnamon
  • ¼ cup Daiya cream cheese
  • ½ cup coconut oil triple filtered
  • 2 tablespoons almond milk
  • 1 tablespoon lemon juice
  • 1 tablespoon lemon zest
  • 1 medium egg
  • ½ cup filling (I like raspberry jam, and the kids also like chocolate chips.  Other classic choices are the poppyseed jam, and apricot jam)

Directions

  1. Mix together the flours, baking soda and baking powder.  Mix in salt, sugar, and cinnamon.
  2. In a separate medium pot, melt the coconut oil and beat into the oil using electric beaters the Daiya cream cheese.
  3. Zest and squeeze a large lemon.  Organic is recommended since you will be using the peel.
  4. Add the zest, lemon juice, and beaten egg to the oil and cream cheese and mix well with the electric beaters.
  5. Slowly pour the liquid into the flour mixture until a soft dough develops
  6. Place the dough into the fridge for at least an hour.
  7. Remove from fridge and preheat oven to 350 degrees.
  8. Roll out dough on a clean flat surface that is lightly floured.  Dough should be about ⅛ inch thick, Keep extra flour on hand to help with any stickiness.
  9. Cut circle shapes using an upside down glass
  10. Drop into each center of each circle a ½ teaspoon of filling
  11. Pinch the corners of the circle to form the shape of a neat triangle.
  12. Place the formed hamantaschen onto a greased baking sheet or parchment paper.
  13. Bake for 10 minutes or till light brown color appears.
  14. Wait for the cookies to cool down before attempting to move.  They are crumbly and delicate when warm, but will harden as they get cooler.  Feel free to double or triple this recipe and freeze your extras. Don’t forget to share with family and friend and…Enjoy!!

Delectably Crispy Gluten-Free Waffles with the Cuisinart Vertical Waffle Maker + Recipe!

Fluffy, crispy and perfectly round wonders… this Cuisinart makes waffle magic. 

Cuisinart WAF-V100 Vertical Waffle Maker

Cuisinart WAF-V100 Vertical Waffle Maker

This morning I felt like I experienced a revolutionary discovery.  A tasty, appetizing, surprisingly fluffy gluten free discovery. How come no one has ever told me before about such joy? How could I have only discovered just this morning at my advanced age of motherhood this wondrous food called waffles? The truth is that I had tasted some bland store-bought waffles before, but had never had the pleasure of making or tasting it from scratch and witnessing the magic of the waffle maker at work. There is something big to be said about fresh and homemade.  It really makes all the difference in taste and texture.

I am not really sure how this Cuisinart Vertical Waffle Maker works its magic though.  I mean the batter that I used was basically the same ingredients I use to make my regular ho hum pancakes.  I always just replace the wheat flour with gluten free baking flour from Trader Joe’s, and substitute dairy milk with almond milk from Trader Joe’s as well. I also use eggs, oil, a pinch of salt, and dash of cinnamon and sugar.  I should mention that I added to my waffles this morning some almond flour as a substitute for a third of the flour.

The point is that this might be the first food item that I have tasted since going gluten free (on and off for four years now) that actually tasted possibly even better than a regular wholesome delicious wheat filled baked good.

I took an educated gamble on purchasing this cool looking waffle maker.  I know and love to use my Cuisinart immersion blender for all my soups and smoothies and it works smoothly and perfectly every time.  I figured, maybe the Cuisinart brand is the way to go in general. I think it was a good gamble!

Before using the waffle maker this morning I made sure to wipe away any remaining dust on the metal surface.  I braced myself for the stinky smell it would make after I plugged in the machine for the first time. The instructions had alerted me to the fact the the non stick coating would at first give off a smell.  They were definitely correct on that point! I opened my windows and doors and turned on the exhaust fan to help dissipate any of the toxicity in the room. Thankfully after a few minutes of having the waffle maker turned on,  the smell seemed to just fade away with no terrible after-effects.

I was worried that it would be difficult to pour into the top spout of the waffle maker without spilling and making a mess, but it was a breeze in the end as I transferred the batter to my measuring cup with a spout. I figured out that ¾ cup measurement is exactly the amount to fill the waffle maker up just enough without excess spillage or overfill.

My next discovery was that the heat setting on the waffle maker is not very intense, and I was able to turn it up to the highest setting which is 5.  I think it just bakes it for longer, but not any hotter. I actually left the batter in there after the waffle maker beeped to signal it was done. (My two year old thought the beeping sound was a truck outside and got very excited for a minute there.  We live on a very quiet street) It was only slightly golden brown. Not a single waffle turned any darker than the slightly warm shade. I definitely didn’t have to worry about burning anything here!!

The next hurdle or worry that I had was laid to rest as I tentatively poked and prodded the waffle around the edges to test how easily it would come off the griddle.  No worries there either! It was simple and satisfying to watch how smoothly the waffle slid right up onto my spatula with the aid of my trusty wooden spoon. I made sure not to put anything metal on the pan because of the delicate non stick coating.

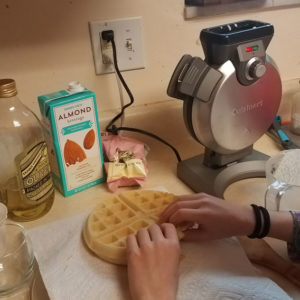
My final discovery for the morning was the actual taste and texture of the waffle.  It was hard for me to believe that anything so fluffy on the inside and lightly crispy on the outside was something that I was able to cobble together with my makeshift gluten free recipe.  And on the first try!

I was able to serve a successful breakfast to all my kids as well as myself and my hungry husband.  We all tried it with wild blueberries, maple syrup and and a dollop of coconut whipped cream. The only thing I will do differently next time is leave out the dash of sugar from my recipe.  The blueberries and maple syrup are all the sweetness that I would ever need on these fluffy,crispy, tasty, perfectly round wonders.

Now my daughter is requesting that I make a new batter tonight just for her, because she wants to bake waffles tomorrow morning before school.  Lucky for me she forgot that she doesn’t have school tomorrow, so that gives me more time to just drool and imagine a pile of freshly made waffles sitting in front of me right now as I type up the longest product review ever written by me, that has possibly turned by now into a novel or maybe just a novelette, but either way, all I know is that I am getting seriously hungry.  And I just ate dinner like an hour ago..Oh well, I guess I didn’t really have dessert yet. Hmmm.

In case you are not hungry enough yourself now, I will attempt to upload some pictures of my waffle maker and the results of this morning’s waffle baking adventures.

Gluten-Free Dairy-Free Waffles 

Serves: 4 adults
Prep & cook time:
10 minutes

Challenge:  Feed a family of seven including five who are on gluten, dairy and soy restrictions.

I have recently discovered a new, light yet satisfying, non messy, child friendly food that the kids and adults can breakfast and snack on all day long with pleasure.  

Gluten, dairy and soy free waffles to the rescue!

I based this recipe on my regular pancake recipe and went online to my latest favorite recipe website: Genius Kitchen. The original Gluten-Free Waffles recipe was a community pick which called for gluten free flour, milk and butter, but I snuck in some almond flour, and switched to almond milk from Trader Joe’s.  

I skipped the butter and used olive oil instead.  Then, as I plugged in my brand new cuisinart waffle maker,  I hoped and prayed for the best. I always pray for the best because I never seem to stick to the the original recipe!   And, I should mention of course that I doubled the recipe to feed my hungry five children and my husband and I.

Ingredients

  • 1 ½ cups gluten-free flour (I use Trader Joe’s baking mix)
  • ½ cup blanched almond flour (Trader Joe’s)
  • ½ teaspoon salt
  • 3 teaspoons baking powder
  • Pinch of cinnamon
  • 1 ½ cups almond milk (Trader Joe’s)
  • 2 eggs
  • 4 teaspoons light olive oil

Directions

In a medium or large bowl mix together the dry ingredients

In a medium bowl beat the eggs and add in the remaining wet ingredients

Stir the wet ingredients into the dry ingredients

Pour carefully into the waffle iron and wait for doneness around 3-5 minutes depending on your waffle iron and personal preference.

Best when served fresh!

Topping ideas

  • Wild blueberries
  • Maple syrup
  • Coconut whipped cream
  • Sunbutter and honey (Good fats for the baby)

Savory version:

(I would really like to try these.  Sometimes it is nice to have a break from all the sweets!)

  • Avocado and salsa
  • Eggs and sliced tomatoes
  • Shnitzel or breaded chicken with mango salsa (avocado, mango, red onion, lemon juice)